Eclipse 环境下编译 / 调试 Shindig
我们通过以下的步骤来完成:
安装 Maven plugin
Maven 是一个基于 Java 的代码构建和依赖管理工具,Apache Shindig 的源代码是通过 Maven 来管理的,所以我们需要安装 Maven 的 Eclipse 插件,读者可以使用 Eclipse 的 updatesite 机制,连接到"http://m2eclipse.sonatype.org/update/"站点安装。
使用 Subversion 下载 Shindig 代码
在 http://svn.apache.org/repos/asf/incubator/shindig/trunk/,使用 SVN 客户端下载到 Shindig 的源代码。
编译和调试 Shindig
首先,在 Eclipse IDE 里,通过 File/Import/General/Maven Projects 选项导入我们下载的所有 Shindig 的源代码。导入完成后,Shindig 就作为几个 Maven 工程存在于你当前的 WorkSpace 中。
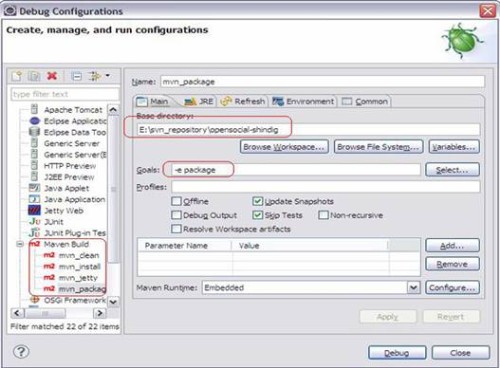
通过 Run/Debug Configurations/Maven Build 配置编译 Shindig 参数,如图 2 所示:
图 2. Package Shindig
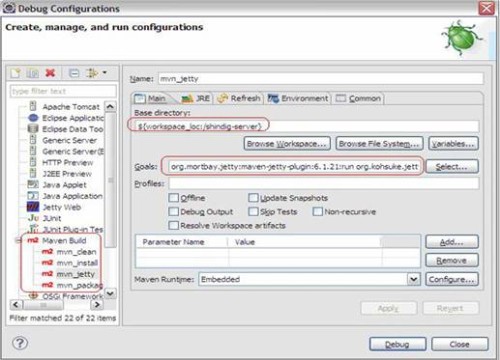
如图 2 所示,“E:\svn_repository\opensocial-shindig”是你的 Shindig 源代码的根目录。点击 Debug, 这将使用 Maven 来 Build 整个 Shindig 代码。在 Build 成功后,我们使用 Jetty 来启动 Shindig,默认情况下,Jetty Server 将运行在 8080 端口。如图 3 所示:
图 3. Run Shindig
如图 3 所示,我们设置了 Maven 目标,使用 Jetty 来启动 Shindig, 而 Base directory 设置为 shindig-server Maven 工程的根目录。点击 Debug, Jetty Server 运行,而 Shindig 部署在 Jetty Server 上。 在 Shindig 成功启动后, 你就可以使用 http://localhost:8080/gadgets/files/samplecontainer/samplecontainer.html来访问 Shindig 提供的 Gadget 的例子。


