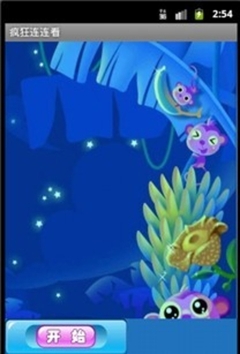
【IT168技术】本程序将会使用一个RelativeLayout作为整体的界面布局元素,界面布局的上面是一个自定义组件,下面是一个水平排列的LinearLayout。
程序清单:codes\18\Link\res\layout\main.xml
<?xml version="1.0" encoding="utf-8"?>
<RelativeLayout
xmlns:android="http://schemas.android.com/apk/res/android"
android:layout_width="fill_parent"
android:layout_height="fill_parent"
android:background="@drawable/room">
<!-- 游戏主界面的自定义组件 -->
<org.crazyit.link.view.GameView
android:id="@+id/gameView"
android:layout_width="fill_parent"
android:layout_height="fill_parent" />
<!-- 水平排列的LinearLayout -->
<LinearLayout
android:layout_width="fill_parent"
android:layout_height="fill_parent"
android:orientation="horizontal"
android:layout_marginTop="380px"
android:background="#1e72bb"
android:gravity="center">
<!-- 控制游戏开始的按钮 -->
<Button
android:id="@+id/startButton"
android:layout_width="wrap_content"
android:layout_height="wrap_content"
android:background="@drawable/button_selector" />
<!-- 显示游戏剩余时间的文本框 -->
<TextView
android:id="@+id/timeText"
android:layout_width="wrap_content"
android:layout_height="wrap_content"
android:gravity="center"
android:textSize="20dip"
android:width="150px"
android:textColor="#ff9" />
</LinearLayout>
</RelativeLayout>
这个界面布局很简单,指定按钮的背景色时使用了@drawable/button_selector,这是一个在res\drawable目录下配置的StateListDrawable对象,配置文件代码如下。
程序清单:codes\18\Link\res\drawable-mdpi\button_selector.xml
<?xml version="1.0" encoding="UTF-8"?>
<selector xmlns:android="http://schemas.android.com/apk/res/android">
<!-- 指定按钮按下时的图片 -->
<item android:state_pressed="true"
android:drawable="@drawable/start_down"
/>
<!-- 指定按钮松开时的图片 -->
<item android:state_pressed="false"
android:drawable="@drawable/start"
/>
</selector>
<selector xmlns:android="http://schemas.android.com/apk/res/android">
<!-- 指定按钮按下时的图片 -->
<item android:state_pressed="true"
android:drawable="@drawable/start_down"
/>
<!-- 指定按钮松开时的图片 -->
<item android:state_pressed="false"
android:drawable="@drawable/start"
/>
</selector>
其中GameView只是一个View的普通子类,开发了上面的界面布局文件之后,运行该程序将可以看到如图18.3所示的界面。

▲游戏界面显示


