【IT168技术】现在,随着越来越多的Android的应用出现在Android Market上,如何能更加吸引用户成为摆在开发者面前的重要课题。作为Android应用,不仅要在内容上取胜,在比如界面等细节上也要很重视用户的使用体验,如果用户觉得操作困难和不符合操作习惯的话,就会认为应用不好用而不去下载或购买。在用户体验中,一些细节的问题更容易引起程序员的忽视。本文将介绍,在Android的界面设计中的各个控件的焦点顺序其中要注意的问题,这个很似简单的问题,值得开发者的重视。
Android设备有多种多样,操纵界面也有所不同,比如有触摸屏、轨迹球,传统的手机键盘等,因此开发者需要更好地了解,当用户在应用程序界面中的不同控件间移动时,各个控件的获得焦点和失去焦点的顺序,以及如何根据用户的操作习惯去自定义这些顺序。
一般情况下,Android对于特定的布局界面,会自动得出一个合适的控件焦点顺序,很多情况下是足够用的了。但是在有的情况下是有例外的。控件的下一个焦点会到达哪一个控件,主要是判断当前控件在指定的方向布局上(up/down/left/right),哪一个是最领近的控件,其扫描顺序为从左到右,从上到下,就象平时阅读书籍一样。
然而,这种顺序有时会带来一点小问题,比如当控件都布置在屏幕的上方时,如果用户再按“up”键,则不会有任何效果,同样,当控件都在屏幕下方、左边、右边时,此时再按如“down”、“Left”,“Right”键时都不会再获得控件的焦点。
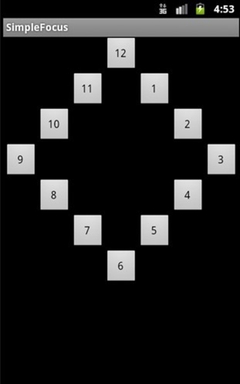
在本文的例子中,将讲解如何修改默认的控件焦点顺序,以定制特定的控件切换顺序,例子中,多个按钮以一个圆形进行了排列,例子可以在
http://android-mt-tutorials.googlecode.com/svn/trunk/SimpleFocus中下载。
步骤1 定义界面布局
我们先设计出界面的布局,代码如下,使用的是Relative相对布局:
<RelativeLayout
xmlns:android="http://schemas.android.com/apk/res/android"
android:layout_width="fill_parent"
android:layout_height="fill_parent">
<Button
style="@style/clockFaceNum"
android:text="12"
android:id="@+id/button12"
android:layout_alignParentTop="true"
android:layout_centerHorizontal="true">
</Button>
<Button
style="@style/clockFaceNum"
android:text="11"
android:id="@+id/button11"
android:layout_below="@+id/button12"
android:layout_toLeftOf="@+id/button12">
</Button>
<Button
style="@style/clockFaceNum"
android:text="1"
android:id="@+id/button1"
android:layout_below="@+id/button12"
android:layout_toRightOf="@+id/button12">
</Button>
<Button
style="@style/clockFaceNum"
android:text="10"
android:id="@+id/button10"
android:layout_below="@+id/button11"
android:layout_toLeftOf="@+id/button11">
</Button>
<Button
style="@style/clockFaceNum"
android:text="2"
android:id="@+id/button2"
android:layout_below="@+id/button1"
android:layout_toRightOf="@+id/button1">
</Button>
<Button
style="@style/clockFaceNum"
android:text="9"
android:id="@+id/button9"
android:layout_below="@+id/button10"
android:layout_toLeftOf="@+id/button10">
</Button>
<Button
style="@style/clockFaceNum"
android:text="3"
android:id="@+id/button3"
android:layout_below="@+id/button2"
android:layout_toRightOf="@+id/button2">
</Button>
<Button
style="@style/clockFaceNum"
android:text="8"
android:id="@+id/button8"
android:layout_below="@+id/button9"
android:layout_toRightOf="@+id/button9">
</Button>
<Button
style="@style/clockFaceNum"
android:text="4"
android:id="@+id/button4"
android:layout_below="@+id/button3"
android:layout_toLeftOf="@+id/button3">
</Button>
<Button
style="@style/clockFaceNum"
android:text="7"
android:id="@+id/button7"
android:layout_below="@+id/button8"
android:layout_toRightOf="@+id/button8">
</Button>
<Button
style="@style/clockFaceNum"
android:text="5"
android:id="@+id/button5"
android:layout_below="@+id/button4"
android:layout_toLeftOf="@+id/button4">
</Button>
<Button
style="@style/clockFaceNum"
android:text="6"
android:id="@+id/button6"
android:layout_below="@+id/button5"
android:layout_centerHorizontal="true">
</Button>
</RelativeLayout>
上面定义的style文件如下:
<?xml version="1.0" encoding="utf-8"?>
<resources>
<style
name="clockFaceNum">
<item
name="android:layout_width">38dp</item>
<item
name="android:layout_height">38dp</item>
<item
name="android:onClick">numClicked</item>
<item
name="android:textSize">9sp</item>
</style>
</resources>
运行后,效果如下图:


