什么是Instrumentation?
一般在开发Android程序的时候,需要写一个manifest文件,其结构是:
<activity android:name=".TestApp" android:label="@string/app_name">
……
</activity>
</application>
这样,在启动程序的时候就会先启动一个Application,然后在此Application运行过程中根据情况加载相应的Activity,而Activity是需要一个界面的。但是Instrumentation并不是这样的。你可以将Instrumentation理解为一种没有图形界面的,具有启动能力的,用于监控其他类(用Target Package声明)的工具类。任何想成为Instrumentation的类必须继承android.app.Instrumentation。下面是这个类的解释:
“Base class for implementing application instrumentation code. When running with instrumentation turned on, this class will be instantiated for you before any of the application code, allowing you to monitor all of the interaction the system has with the application. An Instrumentation implementation is described to the system through an AndroidManifest.xml's
对于单元测试,我们需要认真了解的就是android.test.InstrumentationTestRunner类。这是Android单元测试的主入口。它相当于JUnit当中TestRunner的作用。
那么如何加载它呢,首先要在manifest文件中加入一行关于Instrumentation的声明。比如Android Api Demos中的测试里的manifest是这么写的(我滤掉了所有的注释):
package="com.example.android.apis.tests">
<application>
<uses-library android:name="android.test.runner" />
</application>
<instrumentation android:name="android.test.InstrumentationTestRunner"
android:targetPackage="com.example.android.apis"
android:label="Tests for Api Demos."/>
</manifest>
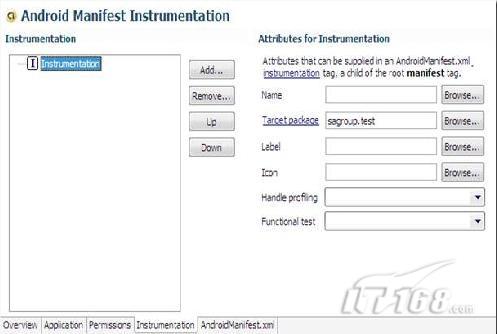
如果用Eclipse的ADT插件(0.8版本以上),也可以用图形界面来添加,如下图:

编辑好 manifest,就可以打包(build,可以用Eclipse ADT来做,也可以用aapt命令手工完成),然后安装到虚拟机上(用adb install命令)。之后就可以利用命令行的方式来加载你的单元测试了。在Android Shell中加载一个Instrumentation的方法是利用以下命令:
adb shell am instrument –w XXXXXX
其中-w是指定Instrumentation类的参数标志。一个简单的例子是:
adb shell am instrument -w com.android.foo/android.test.InstrumentationTestRunner
当然,也可以利用adb shell先进入android命令行模式,再直接写am instrument –w XXXXXXX。下面将具体介绍如何将根据需要加载一组单元测试。


