【IT168技术】在本系列的上一讲中,我们学习了google map 使用的一些简单步骤,其中学习到了如何注册google map api以及如何使用mapview控件。在本讲中,将学习如何根据若干指定的地理位置(给出了经纬度),并在地图上用指定的方法进行弹出显示其地理位置详细信息,其中用到了一个不错的第三方气球标识类库。
步骤1 显示当前位置的信息
在上一讲中,其实我们已经调用获得了用户的当前位置的信息,现在我们需要将其在页面的顶部显示出来,首先打开main.xml,然后添加如下的代码:
android:orientation="horizontal"
android:layout_width="fill_parent"
android:layout_height="wrap_content"
android:id="@+id/infoLinearLayout"
android:clickable="true"
android:onClick="centerToCurrentLocation">
<TableLayout
android:layout_width="fill_parent"
android:layout_height="wrap_content"
android:layout_marginTop="30dp"
android:background="#97000000"
android:padding="7sp">
<TableRow>
<TextView
android:layout_width="fill_parent"
android:layout_height="wrap_content"
android:layout_weight="1"
android:text="@string/latitude"
android:id="@+id/latitudeText"
android:textColor="#FFFFFF">
</TextView>
<TextView
android:layout_width="fill_parent"
android:layout_height="wrap_content"
android:layout_weight="1"
android:text="@string/longitude"
android:id="@+id/longitudeText"
android:textColor="#FFFFFF">
</TextView>
</TableRow>
<TableRow>
<TextView
android:layout_width="fill_parent"
android:layout_height="wrap_content"
android:layout_weight="1"
android:text="@string/accuracy"
android:id="@+id/accuracyText"
android:textColor="#FFFFFF">
</TextView>
<TextView
android:layout_width="fill_parent"
android:layout_height="wrap_content"
android:layout_weight="1"
android:text="@string/provider"
android:id="@+id/providerText"
android:textColor="#FFFFFF">
</TextView>
</TableRow>
</TableLayout>
</LinearLayout>
在上面的代码中,读者可能会注意到在LinearLayout中,使用了onclick事件,其中调用了centerToCurrentLocation这个方法,这其实为用户提供了方便,当用户在地图中导航时,如果要快速返回地图的中心点,只需要点一下地图的空白区域即可。
在上面的代码中,我们还定义了很多文字的提示信息,这些要在strings.xml中进行定义,定义如下:
<string name="longitude">Longitude : </string>
<string name="accuracy">Accuracy : </string>
<string name="provider">Provider : </string>
现在,我们更新下程序,以在屏幕顶部显示当前位置的经纬度和地理位置提供者provider的信息,如下:
((TextView)findViewById(R.id.longitudeText)).setText("Longitude : " + String.valueOf((int)(currentLocation.getLongitude()*1E6)));
((TextView)findViewById(R.id.accuracyText)).setText("Accuracy : " + String.valueOf(location.getAccuracy()) + " m");
我们记得定义centerToCurrentLocation这个方法,该方法其实是调用了第一讲中的animateToCurrentLocation();方法,如下:
public void centerToCurrentLocation(View view){
animateToCurrentLocation();
}
步骤2 使用第三方的位置显示类库
在这个步骤中,我们尝试做到通过在地图上标示若干固定位置的方法,吸引用户的注意。标注的方法我们希望通过图形去实现,其形状有点象大头针的样子,当用户点每个标示点时,会弹出显示该地点的详细信息。为了实现这个目的,我们找到了一款优秀的第三方位置显示类库,其下载地址在:https://github.com/jgilfelt/android-mapviewballoons/downloads
如果用过Google Map地图的开发者可能会认为,Android自带的ItemizedOverlay类也可以实现类似的功能。没错,但ItemizedOverlay类没能象这个类库那样,当点击时默认自动象气泡那样弹出一个小的信息提示框,效果没这个COOL,所以我们选择类该类库。为了要使用该类库,我们要学习如何在已有的项目库中将这个类库工程包含进来。
首先,将下载好的类库文件解压缩。然后在eclipse中,如下图,选择Import导入工程项目,
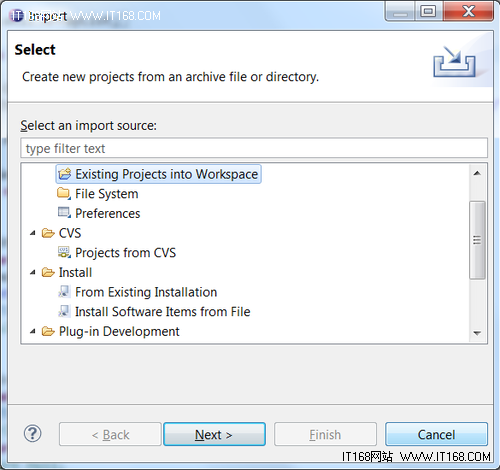
点上图中的Next进入下一步,在select root directory中选择刚解压缩的文件所在目录,这时会出现如下图所示的两个工程项目,其中一个是库文件,另外一个是例子工程,我们同时都引入两个项目。
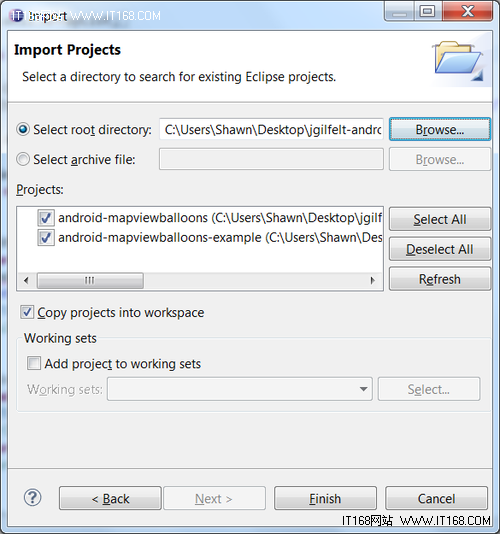
点Finish键完成整个操作。然后会在工程资源管理器中看到有名为
android-mapviewballoons的工程出现了,鼠标右键打开该工程,然后在下图工程项目的Android属性选项卡中,确保右下角的Is Library选项框被勾选

现在,我们还需要在目前的工程中把这个引入的第三方工程包含进去。步骤为同样先打开现在的工程(MallFinder),然后打开到出现上图的样子,但这次选择的是“Add”按钮,添加一个工程,如下图,选择android-mapviewballoons工程为要包含的工程。
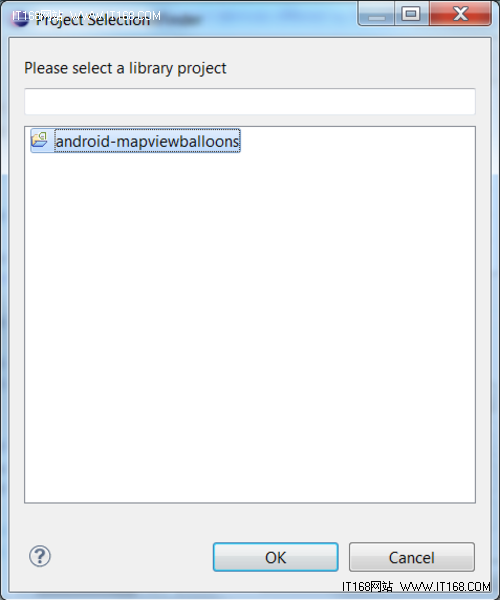
最后点OK即可。
步骤3 创建自定义的overlay类
在这个步骤中,由于我们已经引入了第三方类库,因此在创建地图信息的自定义图层类时,可以继承这个第三方类库已经设计好的BalloonItemizedOverlay类,从而减轻很多的编码工作。现在进行相关操作:
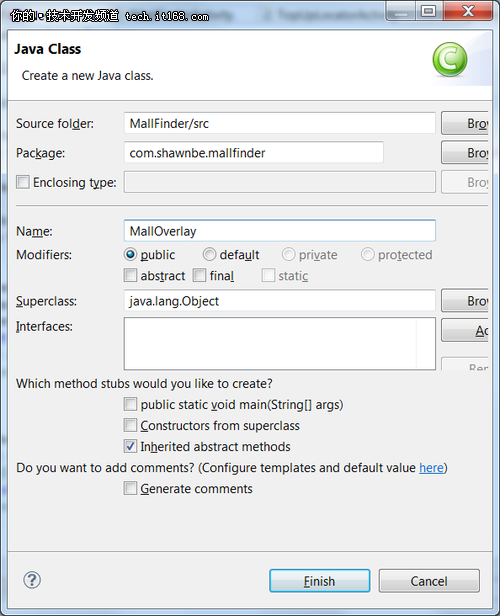
在工程的src目录下,找到com.shawnbe.mallfinder包,新建立一个类,如下图:
由于要继承BalloonItemizedOverlay类,所以修改eclipse生成的代码为如下:
public class MallOverlay extends BalloonItemizedOverlay
我们同时再引入如下的一些类:
import com.google.android.maps.MapView;
import com.google.android.maps.OverlayItem;
import com.readystatesoftware.mapviewballoons.BalloonItemizedOverlay;
完整的MallOverlay类代码如下:
import android.graphics.drawable.Drawable;
import com.google.android.maps.MapView;
import com.google.android.maps.OverlayItem;
import com.readystatesoftware.mapviewballoons.BalloonItemizedOverlay;
public class MallOverlay extends BalloonItemizedOverlay<OverlayItem> {
public MallOverlay(Drawable defaultMarker, MapView mapView) {
super(defaultMarker, mapView);
// TODO Auto-generated constructor stub
}
@Override
protected OverlayItem createItem(int i) {
// TODO Auto-generated method stub
return null;
}
@Override
public int size() {
// TODO Auto-generated method stub
return 0;
}
}
上面是一个框架结构,现在要往其中增加一些实际的方法代码。首先,先声明一些全局变量,如下:
private ArrayList<OverlayItem> malls = new ArrayList<OverlayItem>();
private Location currentLocation;
然后修改如下代码:
public MallOverlay(Drawable defaultMarker, MapView mapView) {
super(boundCenter(defaultMarker),mapView);
boundCenter(defaultMarker);
mContext = mapView.getContext();
}
@Override
protected OverlayItem createItem(int i) {
// TODO Auto-generated method stub
return malls.get(i);
}
@Override
public int size() {
// TODO Auto-generated method stub
return malls.size();
}
public void addOverlay(OverlayItem overlay) {
malls.add(overlay);
populate();
}
@Override
protected boolean onBalloonTap(int index, OverlayItem item) {
Toast.makeText(mContext, "Overlay Item " + index + " tapped!",
Toast.LENGTH_LONG).show();
return true;
}
在上面的程序中,addOverlay方法用于向已有的地图层List中增加一个OverlayItem实例对象,而onBalloonTap方法中,则在当用户点某一个地图上的标注时弹出显示。
步骤4 显示当前位置标识
我们将用两种不同的图案来标识地图的标识,如下图,蓝色的图形表示当前用户所在的位置,红色的图形表示
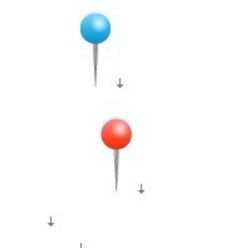
我们把这两张图下载下来,并且放到工程的drawable目录。这里将其放到res目录下的drawable-hdpi文件夹,因为本文只用到了HDPI的分辨率,在实际开发中,建议做中及低分辨率的图片已提供更好的适应性。
接下来,编写一个方法,在当前位置中绘制出蓝色的标识。代码如下:
List<Overlay> overlays = mapView.getOverlays();
overlays.remove(currPos);
Drawable marker = getResources().getDrawable(R.drawable.me);
currPos = new MallOverlay(marker,mapView);
if(currentPoint!=null){
OverlayItem overlayitem = new OverlayItem(currentPoint, "Me", "Here I am!");
currPos.addOverlay(overlayitem);
overlays.add(currPos);
currPos.setCurrentLocation(currentLocation);
}
}
同时要记得在主方法onCreate()方法中加入调用的语句:
drawCurrPositionOverlay();
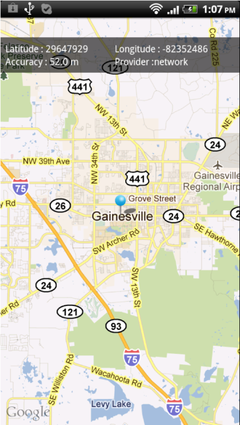
运行应用,可以看到有如下图的结果:
步骤5 增加各位置点的地图标识
接下来,我们将在地图上增加若干个地点的经纬度(暂时只是固定编码格式,在实际应用中,应该是从数据库中读取),并用红色的图形标识出来。为了演示方便,在本文中,用硬编码的方式,强制设置用户当前的位置,因此修改setCurrentLocation方法如下:
/* int currLatitude = (int) (location.getLatitude()*1E6);
int currLongitude = (int) (location.getLongitude()*1E6);
currentPoint = new GeoPoint(currLatitude,currLongitude); */
currentPoint = new GeoPoint(29647929,-82352486);
currentLocation = new Location("");
currentLocation.setLatitude(currentPoint.getLatitudeE6() / 1e6);
currentLocation.setLongitude(currentPoint.getLongitudeE6() / 1e6);
((TextView)findViewById(R.id.latitudeText)).setText("Latitude : " + String.valueOf((int)(currentLocation.getLatitude()*1E6)));
((TextView)findViewById(R.id.longitudeText)).setText("Longitude : " + String.valueOf((int)(currentLocation.getLongitude()*1E6)));
((TextView)findViewById(R.id.accuracyText)).setText("Accuracy : " + String.valueOf(location.getAccuracy()) + " m");
drawCurrPositionOverlay();
}
可以看到,这里我们强制用currentPoint指定了一个经纬度的位置。接下来,在drawMalls()方法中,我们固定假设有6个不同的地理位置点(比如不同的商场位置),然后分别添加到图层中去,如下代码:
Drawable marker = getResources().getDrawable(R.drawable.malls);
MallOverlay mallsPos = new MallOverlay(marker,mapView);
GeoPoint[] mallCoords = new GeoPoint[6];
//Load Some Random Coordinates in Miami, FL
mallCoords[0] = new GeoPoint(29656582,-82411151);//The Oaks Mall
mallCoords[1] = new GeoPoint(29649831,-82376347);//Creekside mall
mallCoords[2] = new GeoPoint(29674146,-8238905);//Millhopper Shopping Center
mallCoords[3] = new GeoPoint(29675078,-82322617);//Northside Shopping Center
mallCoords[4] = new GeoPoint(29677017,-82339761);//Gainesville Mall
mallCoords[5] = new GeoPoint(29663835,-82325599);//Gainesville Shopping Center
List<Overlay> overlays = mapView.getOverlays();
OverlayItem overlayItem = new OverlayItem(mallCoords[0], "The Oaks Mall", "6419 W Newberry Rd, Gainesville, FL 32605");
mallsPos.addOverlay(overlayItem);
overlayItem = new OverlayItem(mallCoords[1], "Creekside Mall", "3501 Southwest 2nd Avenue, Gainesville, FL");
mallsPos.addOverlay(overlayItem);
overlayItem = new OverlayItem(mallCoords[2], "Millhopper Shopping Center", "NW 43rd St & NW 16th Blvd. Gainesville, FL");
mallsPos.addOverlay(overlayItem);
overlayItem = new OverlayItem(mallCoords[3], "Northside Shopping Center", "Gainesville, FL");
mallsPos.addOverlay(overlayItem);
overlayItem = new OverlayItem(mallCoords[4], "Gainesville Mall", "2624 Northwest 13th Street Gainesville, FL 32609-2834");
mallsPos.addOverlay(overlayItem);
overlayItem = new OverlayItem(mallCoords[5], "Gainesville Shopping Center", "1344 N Main St Gainesville, Florida 32601");
mallsPos.addOverlay(overlayItem);
overlays.add(mallsPos);
mallsPos.setCurrentLocation(currentLocation);
}
在上面的代码中,每生成一个新的地理位置点(overlayItem对象的实例),就将其添加到mallsPos中去(使用mallsPos.addOverlay(overlayItem)方法。最后记得还是要在onCreate方法中加上对drawMalls()方法的调用。
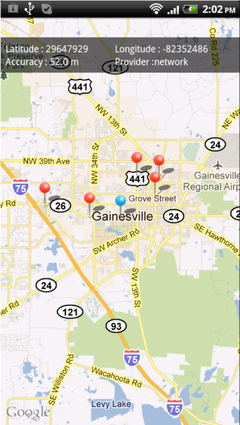
运行程序后,可以看到如下的结果,其中有5个红色点标出了附近的5个商店的位置,蓝色点的位置表示当前用户的位置。
步骤6 显示距离各个标识点的距离信息
现在,当我们点地图上的各个位置点时,会显示出该位置点的简要信息,但我们要设计得更深入点,希望当点这些位置点时,显示出这些点距离用户当前位置点有多远的距离,这样能给用户更直观良好的用户体验。下面我们开始动手进行改造。
首先,打开MallOverlay.java文件,增加如下的方法。该方法的作用是接受GeoPoint类型作为参数并且返回的是Location类型的结果,因为在Android Google Map中,如果要使用distanceTo方法去计算距离,必须使用Location类型的变量。
Location convertedLocation = new Location("");
convertedLocation.setLatitude(gp.getLatitudeE6() / 1e6);
convertedLocation.setLongitude(gp.getLongitudeE6() / 1e6);
return convertedLocation;
}
接下来,我们在onBalloonTop事件中,修改代码如下,计算出用户当前点跟指定其他商店位置的距离。
String tmp = malls.get(index).getTitle();
GeoPoint mallPoint = malls.get(index).getPoint();
Location tmpLoc = convertGpToLoc(mallPoint);
double distance = ((currentLocation).distanceTo(tmpLoc))*(0.000621371192);
DecimalFormat df = new DecimalFormat("#.##");
tmp = tmp + " is " + String.valueOf(df.format(distance)) + " miles away.";
Toast.makeText(mContext,tmp,Toast.LENGTH_LONG).show();
return true;
}
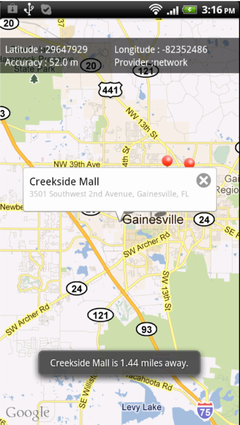
上面的代码中,通过tmp变量获得了某个商店的名称,然后mallPoint是获得这个商店所在位置的GeoPoint是多少,然后通过convertGpToLoc方法转为Location对象的实例。然后调用distanceTo方法计算当前位置跟商店所在位置的距离,最后通过Toast的方式显示出来,如下图:
到此,我们完成了一个基于Google Map的简单LBS的位置应用。本文的代码可以在如下地址下载:
http://mobiletuts.s3.amazonaws.com/Android-SDK_Mall-Locations/2/MallFinderP2.zip
小结
在本系列的两篇教程中,我们学习了如何使用Google Map API的一些基本用法,包括如何注册使用Google Map API KEY,如何使用MapView控件,以及如何充分利用第三方的地理信息位置标识库,显示需要显示的地理位置信息。读者可以在本教程的基础上进行适当的扩展,以编写优秀的LBS手机应用。


