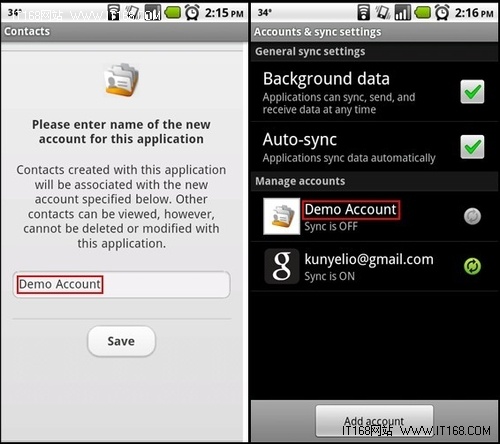
【IT168技术】本文是jQuery Mobile设计Android通讯录系统教程的第二篇,在上一篇教程中(http://publish.itpub.net/a2011/0517/1191/000001191561.shtml),初步介绍了我们要设计的应用的架构和页面结构,并介绍了Jquery Mobile框架中重要的页面元素的知识,以及Android JAVA应用程序如何跟前端的Javascript页面进行交互。在本系列教程的第二篇,将介绍如何创建新的通讯录帐号及如何修改和删除已经存在的通讯录名单。
创建通讯录帐号
下面来看下如何新创建通讯录帐号。用户只需要输入自己的姓名,点保存按钮。其中该部分的代码是在ListPage.html中可以找到,代码如下:
...
<body>
<!-- Container Page -->
<div data-role="page" data-theme="c" id="containerPage">
...
<!-- Create Account -->
<div data-role="header" id="hdrAccount" data-nobackbtn="true" data-theme="c">
<h1>Create Account</h1>
</div>
<div data-role="content" id="contentAccount" data-theme="c">
<div align="CENTER"><img src="img/contacts-master-bgd.png"></div>
<div align="CENTER"><h4>Please enter name of the new account for this application</h4></div>
<div align="CENTER">Contacts created with this application will be associated with the new account specified below.
Other contacts can be viewed, however, cannot be deleted or modified with this application.</div>
<div align="CENTER" id="accountDiv" data-role="fieldcontain">
<input id="accountName" type="text" />
</div>
<div align="CENTER">
<a href="javascript:createAccount();return false;" data-role="button"
data-inline="true">Save</a>
</div>
...
</div>
<div data-role="footer" id="ftrAccount" data-theme="c"></div>
</div> <!-- Container Page Ends Here -->
...
<script>
...
function createAccount(){
showProgress();
contactSupport.createAccount($('#accountName').val(),'ListPage.html');
}
...
</script>
· 我们把创建帐号这个页面放在页面容器中,这个页面有自己的头部,内容content部分和页脚部分。
· 当点SAVE按钮时,将会调用Javasccript中的createAccount()方法。
· 在Javasccript中的createAccount()方法中,获得用户的输入的帐号名,即使用
'#accountName').val()获得其值,然后通过调用后端Android Java应用中的createAccount方法去保存帐户名。跟后端Android Java的交互,在本系列的第一篇教程中有提到,如果不大清楚,请查看第一篇教程。
下面看下后端的Android Java应用中的createAccount方法如何编写。
import android.accounts.Account;
...
public class ContactsActivity extends Activity {
...
private String accountType = null;
...
public void onCreate(Bundle savedInstanceState) {
...
accountType = "com.jquerymobile.demo.contact";
...
}
public void createAccount(String accountN, String displayPage){
if(accountN != null && !"".equals(accountN)){
accountName = accountN;
AccountManager.get(this).addAccountExplicitly(new Account(accountName,accountType), "dummyPassword", null);
}
loadPage(displayPage);
}
...
}
下面讲解下这段代码:
· 实际上帐号的创建是通过android.accounts.AccountManager类去创建的。Android2.0中加入了一个新的包android.accounts,该包主要包括了集中式的账户管理API,用以安全地存储和访问认证的令牌和密码,比如,我们的手机存在多个账户,每个账户下面都有不同的信息,甚至每个账户都可以与不同的服务器之间进行数据同步(例如,手机账户中的联系人可以是一个Gmail账户中的通讯录,可联网进行同步更新)。
这里首先通过AccountManager.get()获得了它的一个实例,接着调用其addAccountExplicitly方法,创建了一个新的帐号,和密码(这里的密码默认是dummyPassword),当帐号创建完后,将回调HTML页面,这里通过loadPage方法去加载回调HTML页面。
.为了能调用Android API中的创建帐号的功能,必须在
AndroidManifest.xml中进行如下设置,声明一个intent-filter:
<action android:name="android.accounts.AccountAuthenticator"/>
</intent-filter>
.除此之外,必须在meta-data中声明帐号验证器如下:
android:name="android.accounts.AccountAuthenticator"
android:resource="@xml/authenticator" />
Finally, the res/xml/authenticator.xml configuration file (which is value of the android:resourceattribute above) should have an element named account-authenticator where value ofandroid:accountType attribute is set to com.jquerymobile.demo.contact. Note that this is value of theaccountType in ContactsActivity. Summarizing the discussion, first look at the highlighted section inAndroidManifest.xml. 这里,用android:resource的值,指出了要在res/xml下配置一个验证配置文件authenticator.xml,文件如下:
<?xml version="1.0" encoding="utf-8"?>
<account-authenticator xmlns:android="http://schemas.android.com/apk/res/android"
android:accountType="com.jquerymobile.demo.contact"
android:icon="@drawable/icon"
android:smallIcon="@drawable/icon"
android:label="@string/app_name"
/>
其中的android:accountType指出了要验证的帐号的实体类为com.jquerymobile.demo.contact。最后我们综合看下修改后的AndroidManifest.xml如下:
<manifest xmlns:android="http://schemas.android.com/apk/res/android"
package="com.jquerymobile.demo.contact"
android:versionCode="1"
android:versionName="1.0">
<uses-permission android:name="android.permission.READ_CONTACTS"/>
<uses-permission android:name="android.permission.WRITE_CONTACTS"/>
<uses-permission android:name="android.permission.GET_ACCOUNTS" />
<uses-permission android:name="android.permission.AUTHENTICATE_ACCOUNTS" />
<application android:debuggable="true" android:icon="@drawable/icon"
android:label="@string/app_name">
<service
android:name=".authentication.AuthenticationService"
android:exported="true">
<intent-filter>
<action android:name="android.accounts.AccountAuthenticator" />
</intent-filter>
<meta-data android:name="android.accounts.AccountAuthenticator"
android:resource="@xml/authenticator" />
</service>
<activity android:name=".ContactsActivity"
android:configChanges="orientation|keyboardHidden"
android:label="@string/app_name">
<intent-filter>
<action android:name="android.intent.action.MAIN" />
<category android:name="android.intent.category.LAUNCHER" />
</intent-filter>
</activity>
</application>
</manifest>
在文件中用uses-permission分别设置了帐号的读写或校验的权限,并且声明了帐号的管理服务实现类为com.jquerymobile.demo.contact. authentication.AuthenticationService,在这个类中,将编写一些关于帐号管理操作的业务逻辑。这个帐号业务管理器被定义为Android中的一个服务,代码如下:
import android.app.Service;
import android.content.Intent;
import android.os.IBinder;
public class AuthenticationService extends Service {
public IBinder onBind(Intent intent) {
return null;
}
}
可以看到,这里跟普通的编写Android服务没什么大的区别,这里在onBind()中并没有编写具体的代码,只是返回了null。但如果你需要将创建的帐号跟一些在线服务结合起来,那么则需要在这里编写相关的实现代码,并且还需要实现android.accounts.AbstractAccountAuthenticator接口。这里我们足够用了,所以返回null。现在,运行程序,在输入帐号并保存后,你会发现在Android 手机中
的Accounts and sync settings的选项设置中,会发现你刚才新建的帐号,如下图所示:

▲


