【IT168技术】很多Cocoa应用程序都需要或多或少得面对授权操作得问题。比如读写系统文件,执行需要授权得进程。
Cocoa中,有很多方式可以实现这个目标,本篇文章,将介绍最常用得三种方式:
1: 官方推荐实例,BetterAuthorizationSample
WWDC2009和2010中,多次提到了这个应用程序实例。这是一个由Apple官方发布得,并广泛推荐得进行授权操作得代码实例。你可以到
http://developer.apple.com/mac/library/samplecode/BetterAuthorizationSample/Introduction/Intro.html
下载并运行此实例。这个实例得中心思想,是将需要授权的应用代码片段和主程序分离,这样,从最大程度上减小了由于主程序出现bug,从而导致权限漏洞得问题,也避免了开发中的bug,导致整个应用程序在高权限下运行的危险。
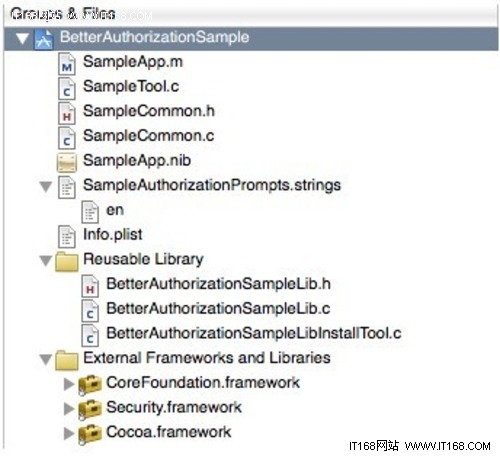
先来看下整个工程的结构,,,,

▲
其中,Reusable Library下的两个类,是完全不需要修改的,BetterAuthorizationSampleLib,实现了授权操作的,和链接授权模块儿所有底 层代码。而BetterAuthorizationSampleLibInstallTool,则实现了如何安装授权模块。除了这两个类,你所需要的改变 的,,,就是SampleCommon类,这个类定义了你所有的授权操作的描述
比如
#define kSampleLowNumberedPortsCommand “LowNumberedPorts”
// authorization right name
#define kSampleLowNumberedPortsRightName “com.example.BetterAuthorizationSample.LowNumberedPorts”
// request keys
#define kSampleLowNumberedPortsForceFailure “ForceFailure” // CFBoolean (optional, presence implies true)
// response keys (none, descriptors for the ports are in kBASDescriptorArrayKey,
// the number of descriptors should be kNumberOfLowNumberedPorts)
#define kNumberOfLowNumberedPorts 3
{ kSampleLowNumberedPortsCommand, // commandName
kSampleLowNumberedPortsRightName, // rightName
“default”, // rightDefaultRule — by default, you have to have admin credentials (see the “default” rule in the authorization policy database, currently “/etc/authorization”)
“LowNumberedPortsPrompt”, // rightDescriptionKey — key for custom prompt in “SampleAuthorizationPrompts.strings
NULL // userData
},
这个类用来声明将要在你的授权代码模块而中所进行的授权操作和对应的信息。
SampleTools这个类,则是定义了授权代码模块的所有实现。
比如
static OSStatus DoGetLowNumberedPorts(
AuthorizationRef auth,
const void * userData,
CFDictionaryRef request,
CFMutableDictionaryRef response,
aslclient asl,
aslmsg aslMsg
)
// Implements the kSampleLowNumberedPortsCommand. Opens three low-numbered ports
// and adds them to the descriptor array in the response dictionary.
所以我 们可以看到,,,BetterAuthorizationSample的整体架构特别简单,首先定义你的授权操作和权限名称,,,这些定义在 SampleCommon中,然后定义你的所有授权代码模块实现,这些在SampleTool中。也就是说SampleTools中的实现和 SampleCoomon中的定义要一一对应,他俩的连接点在SampleTool中的一段代码中定义:
SampleTool
/*
IMPORTANT
———
This array must be exactly parallel to the kSampleCommandSet array
in “SampleCommon.c”.
*/
static const BASCommandProc kSampleCommandProcs[] = {
DoGetVersion,
DoGetUID,
DoGetLowNumberedPorts,
NULL
};
SampleTool中的这个数组定义,声明了三个方法,,,这三个方法的名称和顺序,要与SampleCommon.h和SampleCommon.m中的声明一一对应,入:
SampleCommon.h
#ifndef _SAMPLECOMMON_H
#define _SAMPLECOMMON_H
#include “BetterAuthorizationSampleLib.h”
/////////////////////////////////////////////////////////////////
// Commands supported by this sample
// “GetVersion” gets the version of the helper tool. This never requires authorization.
#define kSampleGetVersionCommand “GetVersion”
// authorization right name (none)
// request keys (none)
// response keys
#define kSampleGetVersionResponse “Version” // CFNumber
// “GetUIDs” gets the important process UIDs (RUID and EUID) of the helper tool.
#define kSampleGetUIDsCommand “GetUIDs”
// authorization right name
#define kSampleUIDRightName “com.example.BetterAuthorizationSample.GetUIDs”
// request keys (none)
// response keys
#define kSampleGetUIDsResponseRUID “RUID” // CFNumber
#define kSampleGetUIDsResponseEUID “EUID” // CFNumber
// “LowNumberedPorts” asks the helper tool to open some low-numbered ports on our behalf.
#define kSampleLowNumberedPortsCommand “LowNumberedPorts”
// authorization right name
#define kSampleLowNumberedPortsRightName “com.example.BetterAuthorizationSample.LowNumberedPorts”
// request keys
#define kSampleLowNumberedPortsForceFailure “ForceFailure” // CFBoolean (optional, presence implies true)
// response keys (none, descriptors for the ports are in kBASDescriptorArrayKey,
// the number of descriptors should be kNumberOfLowNumberedPorts)
#define kNumberOfLowNumberedPorts 3
// The kSampleCommandSet is used by both the app and the tool to communicate the set of
// supported commands to the BetterAuthorizationSampleLib module.
extern const BASCommandSpec kSampleCommandSet[];
SampleCommon.c
const BASCommandSpec kSampleCommandSet[] = {
{ kSampleGetVersionCommand, // commandName
NULL, // rightName — never authorize
NULL, // rightDefaultRule — not applicable if rightName is NULL
NULL, // rightDescriptionKey — not applicable if rightName is NULL
NULL // userData
},
{ kSampleGetUIDsCommand, // commandName
kSampleUIDRightName, // rightName
“allow”, // rightDefaultRule — by default, anyone can acquire this right
“GetUIDsPrompt”, // rightDescriptionKey — key for custom prompt in “SampleAuthorizationPrompts.strings
NULL // userData
},
{ kSampleLowNumberedPortsCommand, // commandName
kSampleLowNumberedPortsRightName, // rightName
“default”, // rightDefaultRule — by default, you have to have admin credentials (see the “default” rule in the authorization policy database, currently “/etc/authorization”)
“LowNumberedPortsPrompt”, // rightDescriptionKey — key for custom prompt in “SampleAuthorizationPrompts.strings
NULL // userData
},
{ NULL, // the array is null terminated
NULL,
NULL,
NULL,
NULL
}
};
这三个的顺序和名称一定要对上号,这是正确使用BetterAuthorizaitonSampleLib的第一步。。。
都定义好后,我们就可以在App主程序中调用它们
以kSampleLowNumberedPortsCommand为例,我们可以看到这段代码
首先在Main方法中获得授权:
junk = AuthorizationCreate(NULL, NULL, kAuthorizationFlagDefaults, &gAuth);
assert(junk == noErr);
assert( (junk == noErr) == (gAuth != NULL) );
// For each of our commands, check to see if a right specification exists and, if not,
// create it.
//
// The last parameter is the name of a “.strings” file that contains the localised prompts
// for any custom rights that we use.
BASSetDefaultRules(
gAuth,
kSampleCommandSet,
CFBundleGetIdentifier(CFBundleGetMainBundle()),
CFSTR(“SampleAuthorizationPrompts”)
);
这个代码段的作用是在/etc/authorization中注册你在SampleCommon中声明的特权模块名称和权限,,
当注册完成后,我们来看看如何调用授权代码块
OSStatus err;
Boolean success;
CFBundleRef bundle;
CFStringRef bundleID;
CFIndex keyCount;
CFStringRef keys[2];
CFTypeRef values[2];
CFDictionaryRef request;
CFDictionaryRef response;
BASFailCode failCode;
// Pre-conditions
assert(fdArray != NULL);
assert(fdArray[0] == -1);
assert(fdArray[1] == -1);
assert(fdArray[2] == -1);
// Get our bundle information.
bundle = CFBundleGetMainBundle();
assert(bundle != NULL);
bundleID = CFBundleGetIdentifier(bundle);
assert(bundleID != NULL);
// Create the request. The request always contains the kBASCommandKey that
// describes the command to do. It also, optionally, contains the
// kSampleLowNumberedPortsForceFailure key that tells the tool to always return
// an error. The purpose of this is to test our error handling path (do we leak
// descriptors, for example).
keyCount = 0;
keys[keyCount] = CFSTR(kBASCommandKey);
values[keyCount] = CFSTR(kSampleLowNumberedPortsCommand);
keyCount += 1;
if (forceFailure) {
keys[keyCount] = CFSTR(kSampleLowNumberedPortsForceFailure);
values[keyCount] = kCFBooleanTrue;
keyCount += 1;
}
request = CFDictionaryCreate(
NULL,
(const void **) keys,
(const void **) values,
keyCount,
&kCFTypeDictionaryKeyCallBacks,
&kCFTypeDictionaryValueCallBacks
);
assert(request != NULL);
response = NULL;
// Execute it.
err = BASExecuteRequestInHelperTool(
gAuth,
kSampleCommandSet,
bundleID,
request,
&response
);
BASExecuteRequestInHelperTool这个方法,就是BetterAuthorizationSampleLib中提供的方法,,将Auth对象,CommandSet定义和参数传到HelperTool中,HelperTool将根据声明找到对应的实现方法模块,并调用执行。
调用执行授权代码前,BetterAuthorizationSampleLib还会检查你有没有安装授权代码模块(这个模块默认安装到/Library/PrivilegedHelperTools/)文件夹下,,,,如果没有安装,你可以调用 BASFixFailure(gAuth, (CFStringRef) bundleID, CFSTR(“InstallTool”), CFSTR(“HelperTool”), failCode);方法,通过InstallTool(BetterAuthorizationSampleLibInstallTool)进行安装,,,,
所以,你会看到,利用这个Lib做成的应用程序,回分为三个部分

▲
首先是App主程序,主程序当在需要执行授权模块的时候,调用HelperTool,如果HelperTool尚未被安装到/Library/PrivilegedHelperTools/,则主程序会调用InstallTool进行安装。
我们熟知的BBEdit也是使用了此架构,如果你安装了BBEdit,你会在/Library/PrivilegedHelperTools/发现 一个com.barebones.bbedit的授权模块。当你需要使用BBEdit修改任何系统文件时,BBEdit就会调用此授权模块进行编辑。 mfTuneKit在0.3 alpha版本后使用了同样的设计,将权限风险降到最低。
2: 利用authopen命令
你可能觉得使用BetterAuthorizationSample过于复杂和臃肿。确实,对于哪些很小的程序,使用BAS架构是在过于繁琐,那么我们可以利用Mac OS X内置的openauth命令,来执行一些需授权的代码。
比如我要修改/etc/hosts文件,最简单的使用authopen的方法,,,,,
NSString *convertedPath = [NSString stringWithUTF8String:[path UTF8String]];
NSTask *task = [[NSTask alloc] init];
NSPipe *pipe = [[NSPipe alloc] init];
NSFileHandle *writeHandle = [pipe fileHandleForWriting];
[task setLaunchPath:@"/usr/libexec/authopen"];
[task setArguments:[NSArray arrayWithObjects:@"-c", @"-w", convertedPath, nil]];
[task setStandardInput:pipe];
[task launch];
[writeHandle writeData:data];
close([writeHandle fileDescriptor]); // Close it manually
[writeHandle setValue:[NSNumber numberWithUnsignedShort:1] forKey:@”_flags”];
[task waitUntilExit];
首先我们可以读取hosts文件内容,,,修改后,放到NSData对象中,利用NSTask执行authopen,通过流写入,即可,,,注意上面代码中的
[NSArray arrayWithObjects:@"-c", @"-w", convertedPath, nil]
对于authopen,的-c -w参数,则会接受输入流,,,这时系统会弹出一个授权对话框,这个跟上一个方法的区别在于,这个对话框始终是显示authopen进程需要授权,这会给用户带来一定的困惑。
3: 利用AuthorizationCreate API
最后说说利用最广的AuthorizationCreate API。直接看代码:
NSString *toolPath = [[NSBundle mainBundle] pathForAuxiliaryExecutable:@”InstallBootImage”];
AuthorizationFlags authFlags = kAuthorizationFlagDefaults | kAuthorizationFlagInteractionAllowed | kAuthorizationFlagPreAuthorize | kAuthorizationFlagExtendRights;
AuthorizationItem authItems[] = {kAuthorizationRightExecute, strlen([toolPath fileSystemRepresentation]), (void*)[toolPath fileSystemRepresentation], 0};
AuthorizationRights authRights = {sizeof(authItems)/sizeof(AuthorizationItem), authItems};
return (AuthorizationCreate(&authRights, kAuthorizationEmptyEnvironment, authFlags, &auth) == errAuthorizationSuccess);
AuthorizationExecuteWithPrivileges(auth, [toolPath fileSystemRepresentation], kAuthorizationFlagDefaults, toolArgs, NULL);
上面的一段代码用来获得auth授权对象,当授权对象获得成功,则使用AuthorizationExecuteWithPrivileges执行授权代码,,这个使用最为直观简便。
总结:
无论使用哪一种方式,你都需要注意:
1: 尽量精简需授权代码,
2: 尽可能的缩小授权代码作用域
3: 不要忘记使用完成后及时的释放授权对象


