【IT168 技术】Queue 是消息队列,Windows Azure Storage提供了云端的队列——Windows Azure Queue,它为异步工作提供分派消息服务。我们可以用Queue Storage来进行进程间的相互通信(包括运行在不同机器上的进程之间的通信)。一个使用Queue Storage经典的场景是,在一个Web应用程序中,用户通过表单递交给服务器数据,服务器收到数据后将进行处理,而这一处理将花费很多时间。这种情况下,服务器端通过Queue Storage可以把用户递交的信息存储在队列中,后台再运行一个程序从队列中取得数据进行信息的处理。
不管是在Windows或者非Windows环境下,我们都可以使用Windows Storage Queue的REST API来处理消息队列。对.NET开发人员来说, Windows Azure SDK中提供了Microsoft.WindowsAzure.StorageClient类来帮助发送REST请求。
在本文中,我们介绍Windows Storage Queue的架构、应用场景,并通过官方文档中提供的一个图片压缩的案例介绍来对如何使用Windows Storage Queue有一个大致的了解。
Windows Storage Queue的架构
对Windows Storage Queue的架构的介绍,我们还是分成两个层面来介绍,一部分通过应用程序架构来介绍;一部分通过数据对象架构来介绍,下面我们分别来介绍这两部分。
(1) Windows Storage Queue应用程序架构
Windows Storage Queue应用程序架构如图1所示:
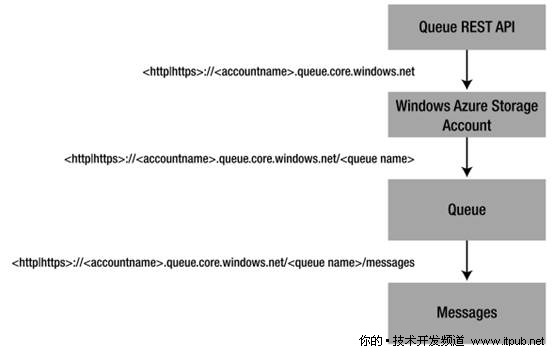
图1 Windows Storage Queue应用架构
由图1我们可以看到,Windows Storage Queue的最上层是Queue REST API,在API的直接下层是Windows Azure Storage存储账号,在这里我们可以看到存储账号用HTTP/HTTPS所表达的地址。在每个存储服务账号下,就包含了Windows Storage Queue,这里Queue的地址实际上是服务账号的地址再加上“Queue Name,队列名称”来表示的。在队列里包含的自然就是“Messages 消息”了,消息的地址就是队列的地址再加上“/messages”。
在编写应用程序的过程中,我们可以使用Windows Azure Storage Client Queue API,这个API的MSDN地址是:
http://msdn.microsoft.com/en-us/library/dd179363.aspx
在这个API中,我们可以对Queue列表、创建队列、消息入队、获取消息、删除消息、设置队列元数据、获取队列元数据、删除队列等操作接口,这些接口主要分成2类,一部分是对Queue的操作,一部分是对Message的操作。它们的命名空间是:
Microsoft.WindowsAzure.StorageClient
在这个命名空间下,队列主要的类图如图2所示:
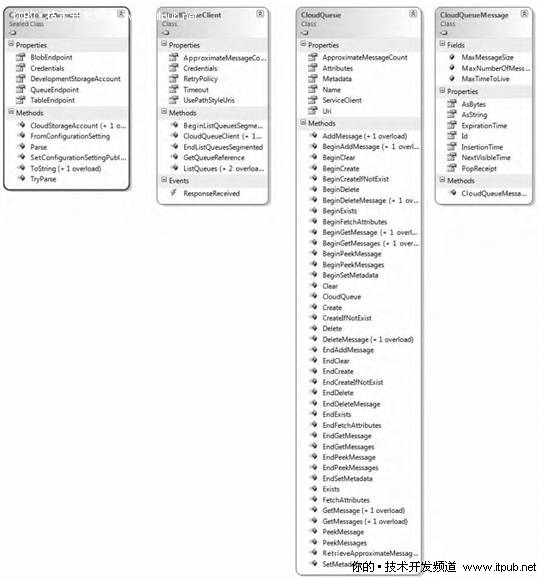
图2 Queue的类图
(2) Windows Storage Queue数据对象架构
本地开发的环境中,我们使用了安装在本地的SQL Express。要想了解Blob的存储结构,首先连接到数据库上看看。
使用SSMS连接本地的SQL Express数据库,如图3所示:
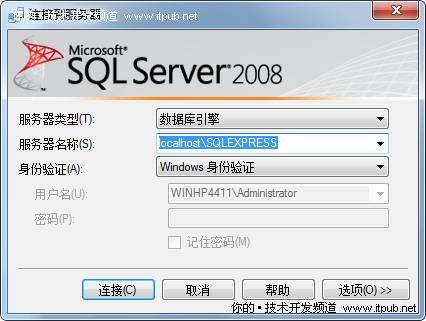
图3 连接本地SQL Express
在这里使用的SQL Express版本是SQL Express 2008,连接上本地SQL Express后,我们可以看到开发环境的存储数据库如图4所示:
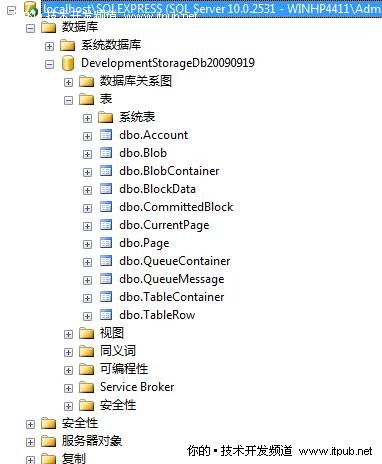
图4 开发环境存储表
由图4中的表我们可以看到,除了账户表(Account),这些表是针对Blob、Queue、Table三种存储服务来设计的,事实上,Blob的存储结构如图5所示:
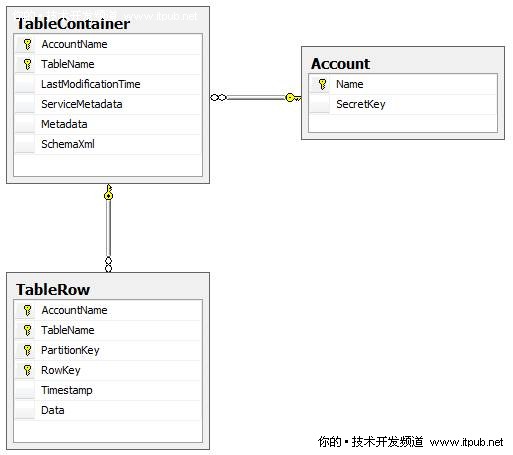
图5 Queue的存储结构
应用场景
场景1:Web Role和Worker Role之间通信
Queue作为一种先进先出的数据结构,在应用中,最常用的是作为Web Role实例和Worker Role实例之间的信息传递通道,而且通过这样的消息传递过程,我们很容易知道消息的先后顺序,典型应用场景如图1所示:
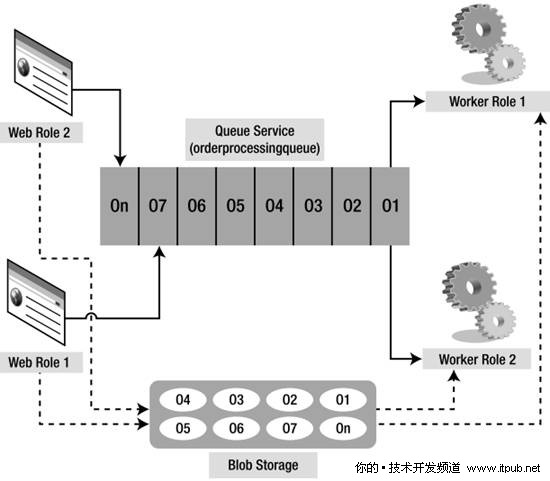
图6 Queue应用场景1
场景2:Worker Role负载分配
在场景2中,我们可以设置Worker Roles能够读取的Message个数,当超过设置的数目后,可以让应用程序创建更多的实例来处理消息。当然,如果消息数目减少了,同样可以删除多余的Queue实例。
场景3:公用消息队列
通过使用REST API,不管是JAVA平台或者是.Net平台,可以公用一个消息队列。
场景4:消息处理
在这个场景中,主要通过设置处理器处理每个消息的平均时间、消息的可见性、不完整的消息没有删除等方法,来保证每一条消息都得到正确的处理。
案例介绍
在本文的案例中,我们将使用Blob存储图片,使用Queue进行Web Role实例和Worker Role实例之间的消息传递。
在开始案例之前我们简要说明一下此案例的开发环境:
VS 2008 / VS 2010
SQL Express 2005 / SQL Express 2008
Windows Azure Tools for Microsoft Visual Studio 1.1,其下载的地址是:
http://www.microsoft.com/downloads/details.aspx?familyid=5664019E-6860-4C33-9843-4EB40B297AB6&displaylang=en
Windows Azure SDK
http://www.microsoft.com/downloads/details.aspx?FamilyID=21910585-8693-4185-826e-e658535940aa&displaylang=en
在本例中,将使用VS 2010来创建项目,下面我们开始介绍这个案例的详细开发步骤:
第一步:创建项目
在开始|所有程序里打开Microsoft Visual Studio 2010,创建新的Cloud项目Thumbnails, 如图7所示:
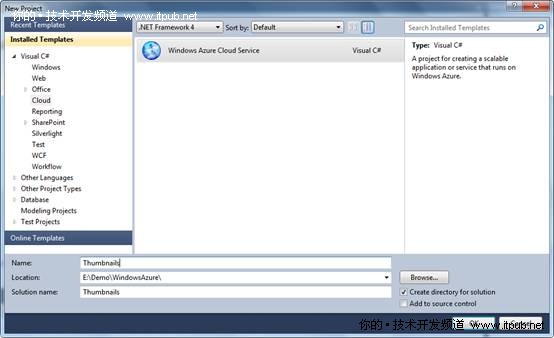
图7 创建项目Thumbnails
输入项目名称Thumbnails,解决方案名称后,点击“确定 OK”,自动打开添加云应用项目界面,如图8所示:
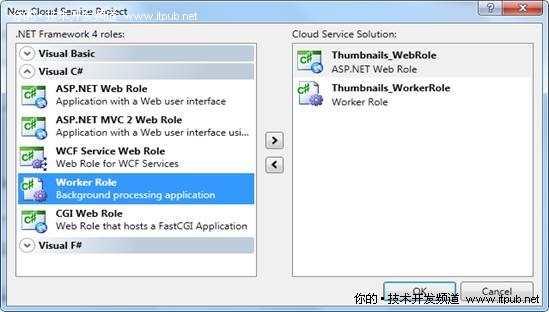
图8 创建Web Role 和Worker Role
选择Asp.Net Web Role,创建名为Thumbnails_WebRole的Web Role项目,选项WorkerRole,创建名为Thumbnail_WorkerRole的Worker Role项目,点击“确定 OK”。
第二步:添加WebRole程序代码
在WebRole程序代码设计部分,我们要完成的任务是:编写Worker Role的功能、设计上传显示界面,完成上传、显示功能,可以说是整个案例代码的核心部分。
我们首先介绍Thumbnails_WorkerRole项目下Work Role的核心代码:
首先要在worker Role短创建缩略图,创建缩略图的方法是:
{
//代码略
}
重写OnStart方法,代码如下
{
DiagnosticMonitor.Start("DiagnosticsConnectionString");
#region Setup CloudStorageAccount Configuration Setting Publisher
// This code sets up a handler to update CloudStorageAccount instances when their corresponding
// configuration settings change in the service configuration file.
CloudStorageAccount.SetConfigurationSettingPublisher((configName, configSetter) =>
{
// Provide the configSetter with the initial value
configSetter(RoleEnvironment.GetConfigurationSettingValue(configName));
RoleEnvironment.Changed += (sender, arg) =>
{
if (arg.Changes.OfType<RoleEnvironmentConfigurationSettingChange>()
.Any((change) => (change.ConfigurationSettingName == configName)))
{
// The corresponding configuration setting has changed, propagate the value
if (!configSetter(RoleEnvironment.GetConfigurationSettingValue(configName)))
{
// In this case, the change to the storage account credentials in the
// service configuration is significant enough that the role needs to be
// recycled in order to use the latest settings. (for example, the
// endpoint has changed)
RoleEnvironment.RequestRecycle();
}
}
};
});
#endregion
return base.OnStart();
}
重写Run方法:
{
//创建云存储账户
var storageAccount = CloudStorageAccount.FromConfigurationSetting("DataConnectionString");
//创建Blob Container
CloudBlobClient blobStorage = storageAccount.CreateCloudBlobClient();
CloudBlobContainer container = blobStorage.GetContainerReference("photogallery");
//创建队列
CloudQueueClient queueStorage = storageAccount.CreateCloudQueueClient();
CloudQueue queue = queueStorage.GetQueueReference("thumbnailmaker");
Trace.TraceInformation("Creating container and queue...");
// If the Start() method throws an exception, the role recycles.
// If this sample is run locally and the development storage tool has not been started, this
// can cause a number of exceptions to be thrown because roles are restarted repeatedly.
// Lets try to create the queue and the container and check whether the storage services are running
// at all.
bool containerAndQueueCreated = false;
while (!containerAndQueueCreated)
{
try
{
container.CreateIfNotExist();
var permissions = container.GetPermissions();
permissions.PublicAccess = BlobContainerPublicAccessType.Container;
container.SetPermissions(permissions);
permissions = container.GetPermissions();
queue.CreateIfNotExist();
containerAndQueueCreated = true;
}
catch (StorageClientException e)
{
if (e.ErrorCode == StorageErrorCode.TransportError)
{
Trace.TraceError(string.Format("Connect failure! The most likely reason is that the local " +
"Development Storage tool is not running or your storage account configuration is incorrect. " +
"Message: '{0}'", e.Message));
System.Threading.Thread.Sleep(5000);
}
else
{
throw;
}
}
}
Trace.TraceInformation("Listening for queue messages...");
// Now that the queue and the container have been created in the above initialization process, get messages
// from the queue and process them individually.
while (true)
{
try
{
CloudQueueMessage msg = queue.GetMessage();
if (msg != null)
{
string path = msg.AsString;
string thumbnailName = System.IO.Path.GetFileNameWithoutExtension(path) + ".jpg";
Trace.TraceInformation(string.Format("Dequeued '{0}'", path));
CloudBlockBlob content = container.GetBlockBlobReference(path);
CloudBlockBlob thumbnail = container.GetBlockBlobReference("thumbnails/" + thumbnailName);
MemoryStream image = new MemoryStream();
content.DownloadToStream(image);
image.Seek(0, SeekOrigin.Begin);
thumbnail.Properties.ContentType = "image/jpeg";
thumbnail.UploadFromStream(CreateThumbnail(image));
Trace.TraceInformation(string.Format("Done with '{0}'", path));
//删除队列消息
queue.DeleteMessage(msg);
}
else
{
System.Threading.Thread.Sleep(1000);
}
}
catch (Exception e)
{
System.Threading.Thread.Sleep(5000);
Trace.TraceError(string.Format("Exception when processing queue item. Message: '{0}'", e.Message));
}
}
}
Worker Role的代码完成后,编写Web Role的代码,这里由于篇幅,就不一一介绍了,感兴趣的读者可以从http://code.msdn.microsoft.com/windowsazuresamples
下载完整的实例代码。
第三步,设置服务定义文件和服务配置文件
服务定义文件设置如下:
<ServiceDefinition name="Thumbnails" xmlns="http://schemas.microsoft.com/ServiceHosting/2008/10/ServiceDefinition">
<WorkerRole name="Thumbnails_WorkerRole">
<ConfigurationSettings>
<Setting name="DataConnectionString" />
<Setting name="DiagnosticsConnectionString" />
</ConfigurationSettings>
</WorkerRole>
<WebRole name="Thumbnails_WebRole">
<InputEndpoints>
<!-- Must use port 80 for http and port 443 for https when running in the cloud -->
<InputEndpoint name="HttpIn" protocol="http" port="80" />
</InputEndpoints>
<ConfigurationSettings>
<Setting name="DataConnectionString" />
<Setting name="DiagnosticsConnectionString" />
</ConfigurationSettings>
</WebRole>
</ServiceDefinition>
服务配置文件设置如下:
<ServiceConfiguration serviceName="Thumbnails" xmlns="http://schemas.microsoft.com/ServiceHosting/2008/10/ServiceConfiguration">
<Role name="Thumbnails_WorkerRole">
<Instances count="1" />
<ConfigurationSettings>
<!-- Add your storage account information and uncomment this to target Windows Azure storage.
<Setting name="DataConnectionString" value="DefaultEndpointsProtocol=https;AccountName=YourAccountName;AccountKey=YourAccountKey" />
<Setting name="DiagnosticsConnectionString" value="DefaultEndpointsProtocol=https;AccountName=DiagnosticsAccountName;AccountKey=DiagnosticsAccountKey" />
-->
<Setting name="DataConnectionString" value="UseDevelopmentStorage=true" />
<Setting name="DiagnosticsConnectionString" value="UseDevelopmentStorage=true" />
</ConfigurationSettings>
</Role>
<Role name="Thumbnails_WebRole">
<Instances count="1" />
<ConfigurationSettings>
<!-- Add your storage account information and uncomment this to target Windows Azure storage.
<Setting name="DataConnectionString" value="DefaultEndpointsProtocol=https;AccountName=YourAccountName;AccountKey=YourAccountKey" />
<Setting name="DiagnosticsConnectionString" value="DefaultEndpointsProtocol=https;AccountName=DiagnosticsAccountName;AccountKey=DiagnosticsAccountKey" />
-->
<Setting name="DataConnectionString" value="UseDevelopmentStorage=true" />
<Setting name="DiagnosticsConnectionString" value="UseDevelopmentStorage=true" />
</ConfigurationSettings>
</Role>
</ServiceConfiguration>
第四步:设置并调试运行项目
设置项目主要是检查windows azure SDK中的Development环境是否已经启动,设置Thumbnails为启动项目,设置Web Role(Thumbnails_WebRole)的Default页面为启动页面。设置完成后,编译项目,编译没有错误后,点击调试|不调试直接运行,打开上传图片的页面,我们上传2张图片后,界面如图9所示:
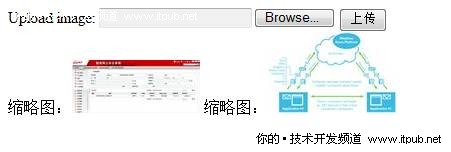
图9 Thumbnails界面
总结
本文介绍了Windows Azure Storage中的消息队列--Windows Azure Queue,它的主要的应用场景在于Web Role和Worker Role之间进行消息传递。同时从应用程序和数据结构两个方面介绍了Queue的结构,并通过应用场景介绍,生成缩略图的一个应用案例的讲解,使大家对Queue有一个更深入的了解。


