【IT168 技术文档】注:(本文为MySQL技术征文大赛冠军文章),第二名,第三名文章将陆续揭晓,敬请关注!
MySQL征文大赛活动地址:http://www.itpub.net/thread-1121603-1-1.html
原文PDF下载:通过Heartbert2让Mysql_Replication具有HA.pdf
前言
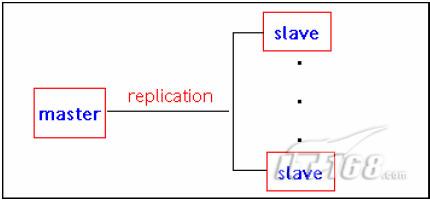
Master-Slave 的数据库机构解决了很多问题,特别是read/write 比较高的应用,结构如图:

1、写操作全部在Master 结点执行,并由Slave 数据库结点定时(默认60s)读取Master 的bin-log
2、将众多的用户读请求分散到更多的数据库节点,从而减轻了单点的压力
它的缺点是:
1、Slave 实时性的保障,对于实时性很高的场合可能需要做一些处理
2、高可用性问题,Master 就是那个致命点(SPOF:Single point of failure)
本文主要讨论的是如何解决第2 个缺点。
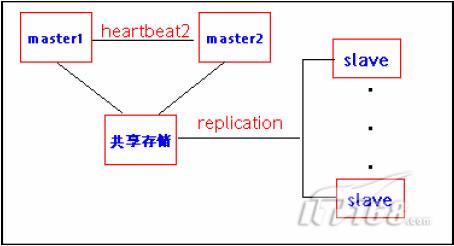
解决方案如下图:

1、使用两个MySQL 主库master1,master2,数据存在共享设备上,用heartbeat2 进行监控,当master1 发生故障时,将资源切换到master2。
2、故障发生后,无需对slave 进行修改,slave 自动切到master2。(断电切换需要手工同步slave)
1、网络设置

2、磁盘设置

3 mysql 安装
3.1 到官方网址http://dev.mysql.com/downloads/mysql/5.1.html 下载最新版本,mysql5.1.31,找到对应的包。在ha1,ha2 分别安装。
# cd /usr/local/
# tar -xzvf mysql-5.1.31-linux-x86_64-glibc23.tar.gz
# mv mysql-5.1.31-linux-x86_64-glibc23 mysql
# groupadd mysql
# useradd -g mysql mysql
#passwd mysql
3.2 修改/etc/my.cf,数据文件路径设置在共享磁盘,修改相关参数,这3 个参数在ha1,ha2上必须一样。
datadir=/u01/data #数据文件路径
server-id = 180 #数据库ID
log-bin=/u01/data/master # binlog 路径
3.3 下面步骤先在ha1 上执行,然后在ha2 执行
先在ha1 把磁盘mount:
[root@ha1 mysql]# mount /dev/sdb /u01
[root@ha1 u01]# mkdir data
[root@ha1 u01]# chown -R mysql.mysql data/
安装mysql:
[root@ha1 u01]# cd /usr/local/mysql
# ./scripts/mysql_install_db --user=mysql
# cp support-files/mysql.server /etc/rc.d/init.d/mysqld
# chmod +x /etc/rc.d/init.d/mysqld
# chkconfig --add mysqld
# /etc/rc.d/init.d/mysqld start
3.4 在ha1 把共享磁盘umount,在ha2 上mount,把上面的数据删除后执行3.3 步骤,完成后ha2 也umount。
3.5 在slave 上安装mysql,数据放在slave 本地,过程略。
4、heartbeat 安装
4.1 官方网址http://www.linux-ha.org,分别在ha1,ha2 安装,确认下列包安装。
[root@ha1 ~]# rpm -ivh libnet-1.1.2.1-2.1.x86_64.rpm
[root@ha1 ~]# rpm -ivh heartbeat-pils-2.1.4-4.1.x86_64.rpm
[root@ha1 ~]# rpm -ivh heartbeat-stonith-2.1.4-4.1.x86_64.rpm
[root@ha1 ~]# rpm -ivh perl-TimeDate-1.16-6.el4.noarch.rpm
[root@ha1 ~]# rpm -ivh heartbeat-2.1.4-4.1.x86_64.rpm
[root@ha1 ~]# rpm -ivh heartbeat-devel-2.1.4-4.1.x86_64.rpm
4.2 开始编辑配置文件(ha1,ha2 都执行)
[root@ha1 local]# cp /usr/share/doc/packages/heartbeat/ha.cf /etc/ha.d/
[root@ha1 local]# cp /usr/share/doc/packages/heartbeat/authkeys /etc/ha.d/
编辑/etc/ha.d/authkeys,使用的是第1 种认证方式(crc),接着把文件的权限改为600:
cat /etc/ha.d/authkeys
显示
auth 1
1 crc
更改文件权限
chmod 600 /etc/ha.d/authkeys
[root@ha1 ~]# cat /etc/ha.d/ha.cf
debugfile /var/log/ha-debug
logfile /var/log/ha-log
logfacility local0
keepalive 1
deadtime 10
warntime 5
udpport 694
crm yes
node ha1 ha2
bcast eth0
auto_failback off
apiauth cibmon uid=hacluster
respawn hacluster /usr/lib64/heartbeat/cibmon –d
配置资源,共享IP,共享磁盘,MYSQL3 个服务组成1 组资源。
[root@ha1 ~]# cat /etc/ha.d/haresources2
ha1 10.0.0.180 Filesystem::/dev/sdb::/u01::ext3 mysqld
启动的时候从左到右依次运行脚本,关闭的时候从右到左依次关闭。
这个文件原名为haresources 在1.x 上使用,不过为了区别使用此名称。
将资源文件转换成cib.xml,2.x 里编译好后自带有转换脚本
[root@ha1 ~]# cd /var/lib/heartbeat/crm/
[root@ha1 crm]# rm -rf cib.xml*
[root@ha1 crm]#
/usr/lib64/heartbeat/haresources2cib.py -stout -c /etc/ha.d/ha.cf /etc/ha.d/haresources2
[root@ha1 crm]# cat cib.xml|grep mysql
<primitive class="lsb" id="mysqld_3" provider="heartbeat" type="mysqld">
<op id="mysqld_3_mon" interval="120s" name="monitor" timeout="60s"/>
即每120 秒检测资源运行情况,如果发现资源不在,则尝试启动资源,如果60s 后还未启动
成功,则资源切换向另节点,可根据业务进行修改。
4.3 启动heartbeat,在ha1 和ha2 都启动
[root@ha1 ~]# /etc/init.d/heartbeat start
查看资源情况
============
Last updated: Tue Feb 24 16:12:10 2009
Current DC: ha2 (0c267980-de77-4421-bcb5-9bb6b0743eef)
2 Nodes configured.
1 Resources configured.
============
Node: ha2 (0c267980-de77-4421-bcb5-9bb6b0743eef): online
Node: ha1 (ab30057d-03f6-4be8-a787-98c5fc7f4c64): online
Resource Group: group_1
IPaddr_10_0_0_180 (ocf::heartbeat:IPaddr): Started ha1
Filesystem_2 (ocf::heartbeat:Filesystem): Started ha1
mysqld_3 (lsb:mysqld): Started ha1
4.4 将heartbeat 设置成开机自动重启
[root@ha1 ~]# chkconfig --add heartbeat
[root@ha1 ~]# chkconfig --level 345 heartbeat on
[root@ha1 ~]# chkconfig --list heartbeat
heartbeat 0:off 1:off 2:on 3:on 4:on 5:on 6:off
5.mysql slave 配置
5.1 在master 赋予slave 权限(任一节点操作)
[root@ha1 ~]# /usr/local/mysql/bin/mysql -u root -p
Enter password:
Welcome to the MySQL monitor. Commands end with ; or \g.
Your MySQL connection id is 4
Server version: 5.1.31-log MySQL Community Server (GPL)
Type 'help;' or '\h' for help. Type '\c' to clear the buffer.
mysql> GRANT RELOAD, REPLICATION SLAVE ON *.* TO 'slave162'@'10.0.0.162'
IDENTIFIED BY 'nslave162';
mysql> show master status\G;
*************************** 1. row ***************************
File: master.000001
Position: 106
Binlog_Do_DB:
Binlog_Ignore_DB:
1 row in set (0.00 sec)
5.2 slave 同步
因为没有数据,所以省略数据同步的步骤,在slalve 执行下列命令:
mysql> CHANGE MASTER TO MASTER_HOST='10.0.0.180',
MASTER_PORT = 3306,
MASTER_USER='slave162',
MASTER_PASSWORD='nslave162',
MASTER_LOG_FILE='master.000001',
MASTER_LOG_POS = 000000106;
Query OK, 0 rows affected (0.01 sec)
mysql> start slave;
Query OK, 0 rows affected (0.00 sec)
mysql> show slave status\G;
*************************** 1. row ***************************
Slave_IO_State:Waiting for master to send event
Master_Host: 10.0.0.180
Master_User: slave162
Master_Port: 3306
Connect_Retry: 60
Master_Log_File: master.000001
Read_Master_Log_Pos: 106
Relay_Log_File: mysql2-relay-bin.000002
Relay_Log_Pos: 248
Relay_Master_Log_File: master.000001
Slave_IO_Running: Yes
Slave_SQL_Running: Yes
1 row in set (0.00 sec)
6、失败测试
6.1 网络切换测试
将ha1 的网线拔掉,在ha2 看资源的切换情况
Node: ha2 (0c267980-de77-4421-bcb5-9bb6b0743eef): online
Node: ha1 (ab30057d-03f6-4be8-a787-98c5fc7f4c64): OFFLINE
Resource Group: group_1
IPaddr_10_0_0_180 (ocf::heartbeat:IPaddr): Started ha2
Filesystem_2 (ocf::heartbeat:Filesystem): Started ha2
mysqld_3 (lsb:mysqld): Started ha2
没有问题,把ha1 网线插上,资源又回切到ha1。
Node: ha2 (0c267980-de77-4421-bcb5-9bb6b0743eef): online
Node: ha1 (ab30057d-03f6-4be8-a787-98c5fc7f4c64): online
Resource Group: group_1
IPaddr_10_0_0_180 (ocf::heartbeat:IPaddr): Started ha1
Filesystem_2 (ocf::heartbeat:Filesystem): Started ha1
mysqld_3 (lsb:mysqld): Started ha1
6.2 宕机切换
将ha1 强制关机在开机,这和6.2 的情况差不多,能正常切换。
6.3 服务切换
将ha1 的mysql 服务强制中断,修改/etc/my.cf
datadir=/u09/data #实际这个路径不存在
[root@ha1 ~]# ps -ef|grep mysql
root 4597 1 0 10:44 ? 00:00:00 /bin/sh ./bin/mysqld_safe
--datadir=/u01/data --pid-file=/u01/data/ha1.pid
mysql 4760 4597 0 10:44 ? 00:00:00 /usr/local/mysql/bin/mysqld
--basedir=/usr/local/mysql --datadir=/u01/data --user=mysql --log-error=/u01/data/ha1.err
--pid-file=/u01/data/ha1.pid --socket=/tmp/mysql.sock --port=3306
root 13174 4285 0 11:22 ? 00:00:00 /bin/sh /etc/init.d/mysqld start
root 13192 4208 0 11:22 pts/0 00:00:00 grep mysql
[root@ha1 ~]# kill 4597 4760
[root@ha1 ~]# ps -ef|grep mysql
root 13532 4208 0 11:23 pts/0 00:00:00 grep mysql
在ha2 上查看资源情况,已经切换过来。
Node: ha2 (0c267980-de77-4421-bcb5-9bb6b0743eef): online
Node: ha1 (ab30057d-03f6-4be8-a787-98c5fc7f4c64): online
Resource Group: group_1
IPaddr_10_0_0_180 (ocf::heartbeat:IPaddr): Started ha2
Filesystem_2 (ocf::heartbeat:Filesystem): Started ha2
mysqld_3 (lsb:mysqld): Started ha2
Failed actions:
mysqld_3_monitor_120000 (node=ha1, call=10, rc=1): complete
mysqld_3_start_0 (node=ha1, call=12, rc=1): complete
6.4 slave 同步测试:
将ha1 的heartbeat 关闭。
[root@ha1 data]# /etc/init.d/heartbeat stop
在ha2 看资源情况。
Node: ha2 (0c267980-de77-4421-bcb5-9bb6b0743eef): online
Node: ha1 (ab30057d-03f6-4be8-a787-98c5fc7f4c64): OFFLINE
Resource Group: group_1
IPaddr_10_0_0_180 (ocf::heartbeat:IPaddr): Started ha2
Filesystem_2 (ocf::heartbeat:Filesystem): Started ha2
mysqld_3 (lsb:mysqld): Started ha2
资源全部切换到ha2,我们执行一些操作,看是否同步。
[root@ha2 ~]# /usr/local/mysql/bin/mysql -u root -p -D test
Enter password:
Welcome to the MySQL monitor. Commands end with ; or \g.
Your MySQL connection id is 30
Server version: 5.1.31-log MySQL Community Server (GPL)
Type 'help;' or '\h' for help. Type '\c' to clear the buffer.
root@test >create table t(t1 int);
root@test >insert into t values(1);
root@test >select * from t;
+------+
| t1 |
+------+
| 1 |
+------+
1 row in set (0.00 sec)
在slave 查看是否同步
[root@mysql2 ~]# /root/cron/lg.sh
Welcome to the MySQL monitor. Commands end with ; or \g.
Your MySQL connection id is 7
Server version: 5.1.31-log MySQL Community Server (GPL)
Type 'help;' or '\h' for help. Type '\c' to clear the buffer.
mysql> use test
Database changed
mysql> select * from t;
+------+
| t1 |
+------+
| 1 |
+------+
1 row in set (0.00 sec)
在将资源切回到ha1,在进行操作,看slave 的情况
[root@ha1 ~]# /etc/init.d/heartbeat start
Node: ha2 (0c267980-de77-4421-bcb5-9bb6b0743eef): online
Node: ha1 (ab30057d-03f6-4be8-a787-98c5fc7f4c64): online
Resource Group: group_1
IPaddr_10_0_0_180 (ocf::heartbeat:IPaddr): Started ha1
Filesystem_2 (ocf::heartbeat:Filesystem): Started ha1
mysqld_3 (lsb:mysqld): Started ha1
资源已经切回到ha1,对其进行操作。
[root@ha1 ~]# /usr/local/mysql/bin/mysql -u root -p -D test
Enter password:
Welcome to the MySQL monitor. Commands end with ; or \g.
Your MySQL connection id is 3
Server version: 5.1.31-log MySQL Community Server (GPL)
Type 'help;' or '\h' for help. Type '\c' to clear the buffer.
mysql> insert into t values(2);
mysql> insert into t values(3);
mysql> select * from t;
+------+
| t1 |
+------+
| 1 |
| 2 |
| 3 |
+------+
3 rows in set (0.00 sec)
在slave 查看是否同步
mysql> select * from t;
+------+
| t1 |
+------+
| 1 |
| 2 |
| 3 |
+------+
3 rows in set (0.00 sec)
mysql> show slave status\G;
*************************** 1. row ***************************
Slave_IO_State:Waiting for master to send event
Master_Host: 10.0.0.180
Master_User: slave162
Master_Port: 3306
Connect_Retry: 60
Master_Log_File: master.000003
Read_Master_Log_Pos: 278
Relay_Log_File: mysql2-relay-bin.000023
Relay_Log_Pos: 420
Relay_Master_Log_File: master.000003
Slave_IO_Running: Yes
Slave_SQL_Running: Yes
Master 切换后,slave 无需任何人工介入,自动同步。
6.5 模拟写入,切换测试。
写个简单的循环,
[root@mysql2 cron]# cat test.sh
for ((num=1;num<10000000;num=num+1))
do
echo
/usr/local/mysql/bin/mysql -u sg -psg109504 -h 10.0.0.180 -D test -e"
insert into t values($num);
"
if (( $? )); then
echo $num:no
else
echo $num:ok
fi
done
在写入过程中,手工切换,手工reboot 等操作,和6.4 的测试结果一样。在写入过程中强制ha1 断电,需要手工处理slave 同步。将ha1 断电后,资源切到ha2 后,在slave 会报错:
mysql> show slave status\G;
*************************** 1. row ***************************
Slave_IO_State:
Master_Host: 10.0.0.180
Master_User: slave162
Master_Port: 3306
Connect_Retry: 60
Master_Log_File: master.000023
Read_Master_Log_Pos: 657144
Relay_Log_File: mysql2-relay-bin.000013
Relay_Log_Pos: 657286
Relay_Master_Log_File: master.000023
Slave_IO_Running: No
Slave_SQL_Running: Yes
查看slave 报错日志:
090225 16:54:51 [Note] Slave I/O thread: Failed reading log event, reconnecting to retry, log
'master.000023' at postion 657144
090225 16:54:51 [ERROR] Error reading packet from server: Client requested master to start
replication from impossible position ( server_errno=1236)
090225 16:54:51 [ERROR] Got fatal error 1236: 'Client requested master to start replication from
impossible position' from master when reading data from binary log
090225 16:54:51 [Note] Slave I/O thread exiting, read up to log 'master.000023', position 657144
在master.000023 中找不到position 657144。
查看master 的binlog。
[root@ha2 data]# /usr/local/mysql/bin/mysqlbinlog master.000023|tail -10
/*!*/;
# at 610152
#090225 16:50:52 server id 180 end_log_pos 610241 Query thread_id=6871
exec_time=0 error_code=0
SET TIMESTAMP=1235551852/*!*/;
insert into t values(6867)
/*!*/;
DELIMITER ;
# End of log file
ROLLBACK /* added by mysqlbinlog */;
/*!50003 SET COMPLETION_TYPE=@OLD_COMPLETION_TYPE*/;
在master 上,master.000023 最后值是610152,而在slave 却是657144。Slave 的Log_Pos比master 大,应该是在断电的时候,binlog 有部分没有及时写入磁盘,但从库已经读入。我们需要在slave 执行change maseter 操作,MASTER_LOG_FILE 在原来的基础上加1,Log_Pos 为1。
mysql> stop slave;
Query OK, 0 rows affected (0.00 sec)
mysql> CHANGE MASTER TO MASTER_HOST='10.0.0.180',MASTER_PORT =
3306,MASTER_USER
='slave162',MASTER_PASSWORD='nslave162',MASTER_LOG_FILE='master.000024',MAST
ER_LOG_POS = 000000001;
Query OK, 0 rows affected (0.00 sec)
mysql> start slave;
Query OK, 0 rows affected (0.00 sec)
mysql> show slave status\G;
*************************** 1. row ***************************
Slave_IO_State:Waiting for master to send event
Master_Host: 10.0.0.180
Master_User: slave162
Master_Port: 3306
Connect_Retry: 60
Master_Log_File: master.000024
Read_Master_Log_Pos: 106
Relay_Log_File: mysql2-relay-bin.000003
Relay_Log_Pos: 248
Relay_Master_Log_File: master.000025
Slave_IO_Running: Yes
Slave_SQL_Running: Yes
在这次断电的切换过程中,将会有657144 减去610152 条binlog 操作在slave 存在,而在masert 没有。在后面的复制中可能会产生错误,不过这些错误影响不大。如果对数据的同步要求很严格,可以在主库添加参数sync_binlog=1,这样最多将只会有1 条数据错误,不过这样将影响mysql 写性能。
7、 heartbeat crm 常用命令
查看资源状态
#crm_mon –i3
查看节点资源
#crm_resource -L
查看资源在那个节点上运行
# crm_resource -W -r mysqld_3
启动/停止资源
#crm_resource -r mysqld_3 -p target_role -v started
#crm_resource -r mysqld _3-p target_role -v stopped
将资源组从当前节点转移到另个节点
#crm_resource -M -r group_1
将资源组转移到指定节点
#crm_resource -M -r group_1 -H ha2
允许资源组回到正常的节点
#crm_resource -U -r group_1
将资源从CRM 中删除
#crm_resource -D -r mysqld_3 -t primitive
将资源组从CRM 中删除
#crm_resource -D –r group_1 -t group
将资源从CRM 中禁用
#crm_resource -p is_managed -r mysqld_3 -t primitive -v off
将资源从新从CRM 中启用
#crm_resource -p is_managed -r mysqld _3-t primitive -v on
重启资源
#crm_resource -C -H ha2 -r mysqld_3
检查所有节点上未在CRM 中的资源
#crm_resource -P
检查指定节点上未在CRM 中的资源
#crm_resource -P -H ha2
检查所有节点上未在CRM 中的资源
#crm_resource -P
检查指定节点上未在CRM 中的资源
#crm_resource -P -H ha2
八、讨论
1、对写要求不是很高的应用,我觉得可以考虑用NFS 来代替共享存储设备,结构图如下:

将数据文件放在NFS 上,这样几台廉价的PC 机就能实现,相对成本降低。
2、参数sync_binlog=1,对写的性能有多少影响,个人始终觉得会带来很大的写性能问题,在数据完整和性能之间做个平衡,有得有失吧。
3、此方案相对网上流传的Master-Master Replication 方案,个人觉得实施起来相对简单,维护也相对简单,缺点是需要一个共享设备,备机在处于空闲状态。在master1 断电的时候,MMM 方案也应该存在主机的内存binlog 丢失的问题,当然,这些我并没有测试过,只是自己的推测。


